
Finding practical lace bow hairstyle ideas instantly elevates your basic routine. Tying a piece of delicate fabric into your hair is a very realistic way to look put together when you are short on time. A soft bow hides messy elastics and makes a simple ponytail look completely intentional. This approach works perfectly for formal events or just running errands. Here are seven realistic ways to incorporate lace bows into your styling rotation.
Grounded Ribbon Styling Options
Here are seven practical concepts focusing on soft volume and realistic wearability. They rely on basic structural foundations rather than highly complicated weaving techniques. Second day hair usually holds these styles much better since the natural oils give the hair extra grip.
The Classic Half Up Bow
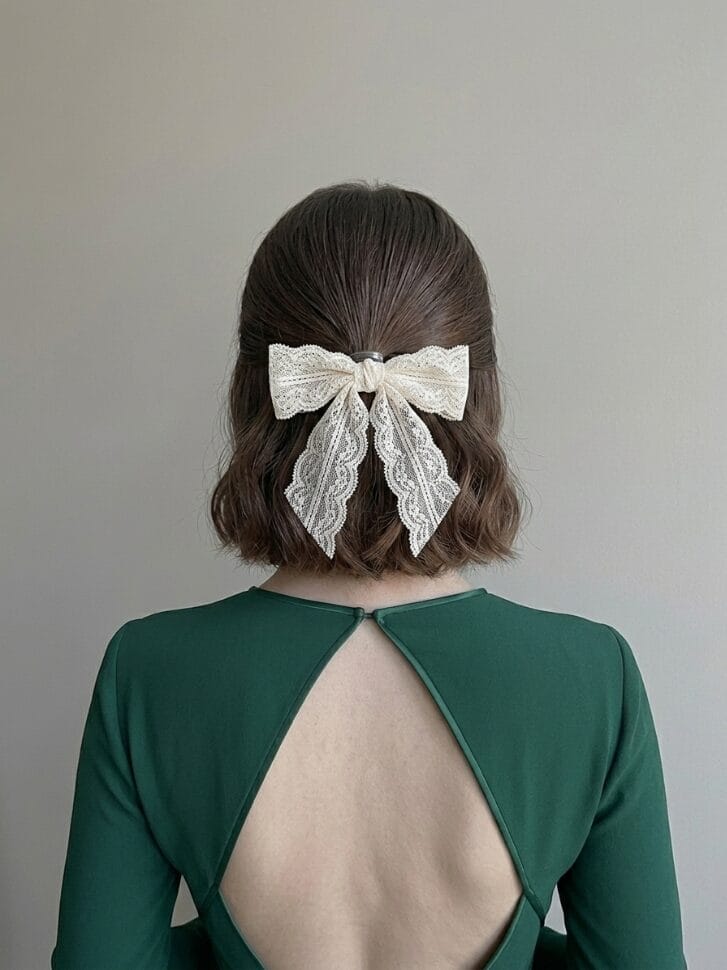
Pull the top section of your hair straight back and secure it with a clear elastic. Tie a piece of wide Chantilly lace directly over the band forming a classic soft bow. This style works exceptionally well for keeping hair out of your face while maintaining length in the back. A silk scarf helps preserve the shape overnight.
Best for: Wavy hair and oval face shapes
| Style Details | |
| Face Shape | Oval, Heart |
| Hair Texture | Wavy or straight |
| Hair Type | Best for medium length cuts |
| Difficulty Level | Beginner |
| Time to Style | Takes 5 minutes |
The Low Ponytail Wrap
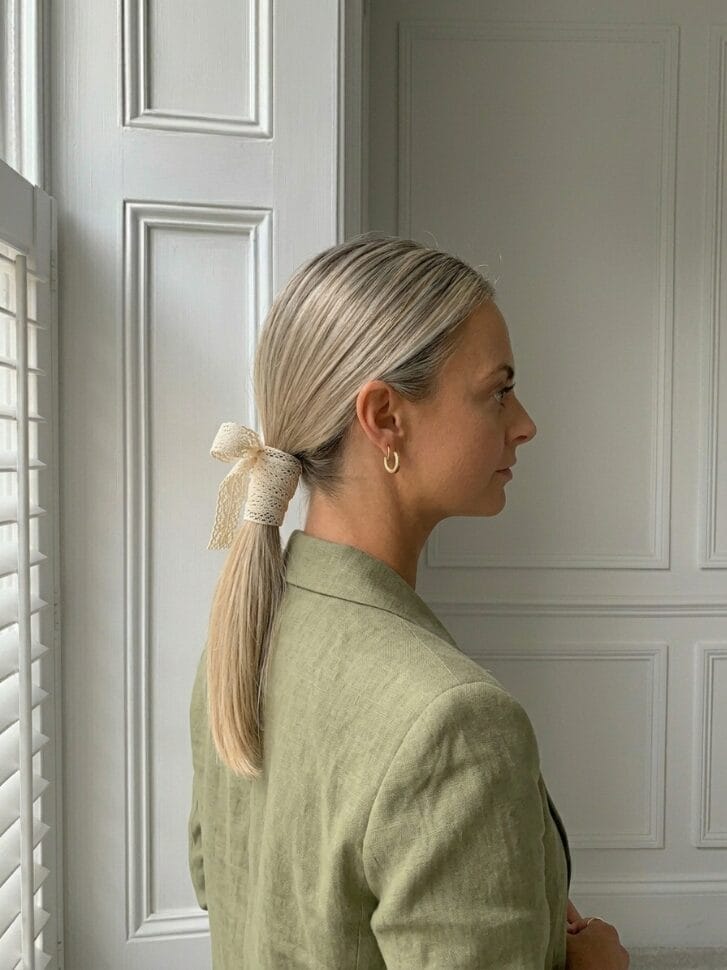
Gather your hair at the nape of your neck into a sleek low ponytail. Wrap a long lace ribbon around the base three times before tying it into a structured bow. The thick fabric physically props the ponytail up slightly to prevent sagging throughout the day. It is a very clean option for a busy office environment.
Best for: Thick hair and round face shapes
| Style Details | |
| Face Shape | Round, Square |
| Hair Texture | Straight naturally |
| Hair Type | Great for long heavy cuts |
| Difficulty Level | Beginner |
| Time to Style | Takes 5 minutes |
The Crown Braided Bow
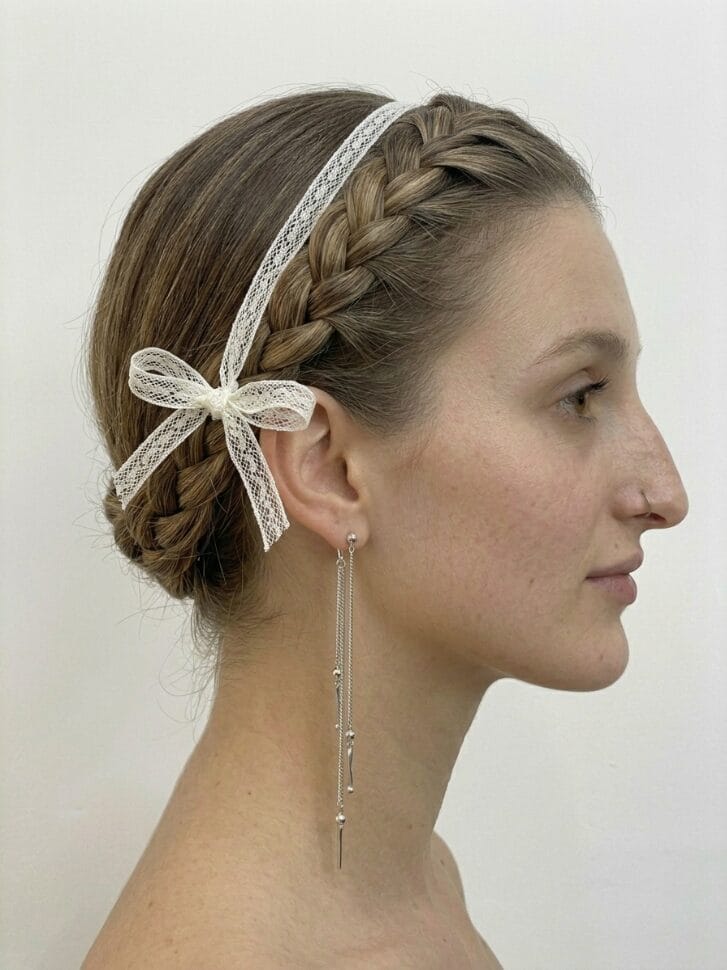
Create a halo braid wrapping completely around your head. Anchor a delicate lace string at the very end of the braid and tie it into a small neat bow resting just above your ear. It adds a subtle vintage touch without overpowering your face. This style works especially well during humid weather when you need maximum hold.
Best for: Curly hair and diamond face shapes
| Style Details | |
| Face Shape | Diamond, Oval |
| Hair Texture | Curly or wavy |
| Hair Type | Best for shoulder length hair |
| Difficulty Level | Advanced |
| Time to Style | Takes 20 minutes |
The Double Space Buns
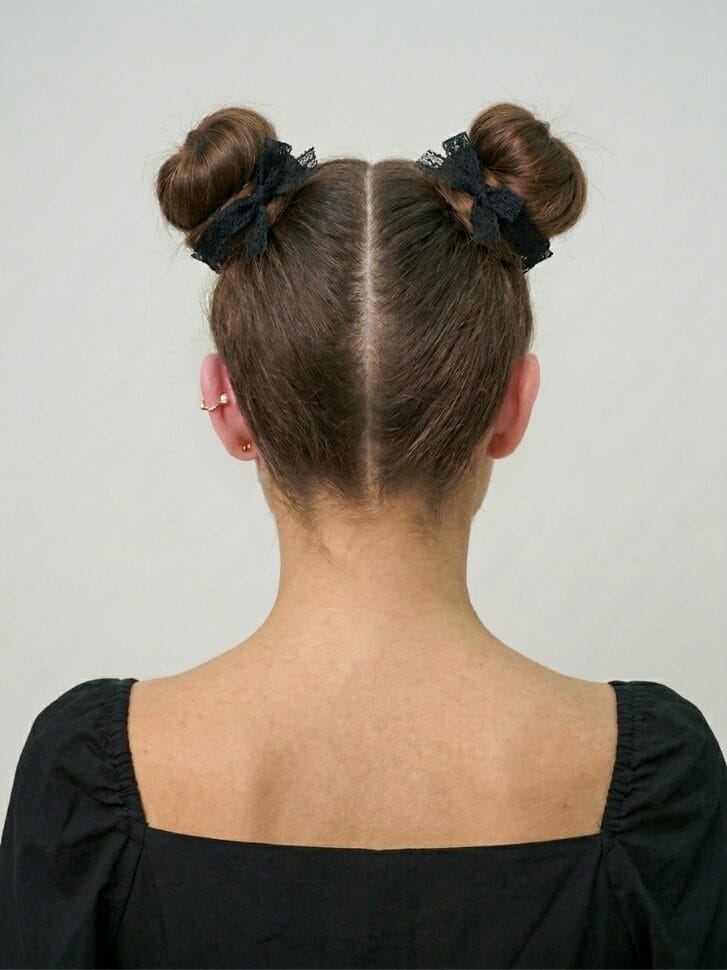
Divide your hair directly down the middle and create two high buns. Tie a short piece of scalloped lace around the base of each bun finishing with tiny bows facing forward. This is a highly playful look that takes almost no time to complete. Slightly stretched curls make parting easier down the center of the scalp.
Best for: Fine hair and heart face shapes
| Style Details | |
| Face Shape | Heart, Round |
| Hair Texture | Straight or wavy |
| Hair Type | Great for fine layered cuts |
| Difficulty Level | Intermediate |
| Time to Style | Takes 10 minutes |
The Fishtail End Bow
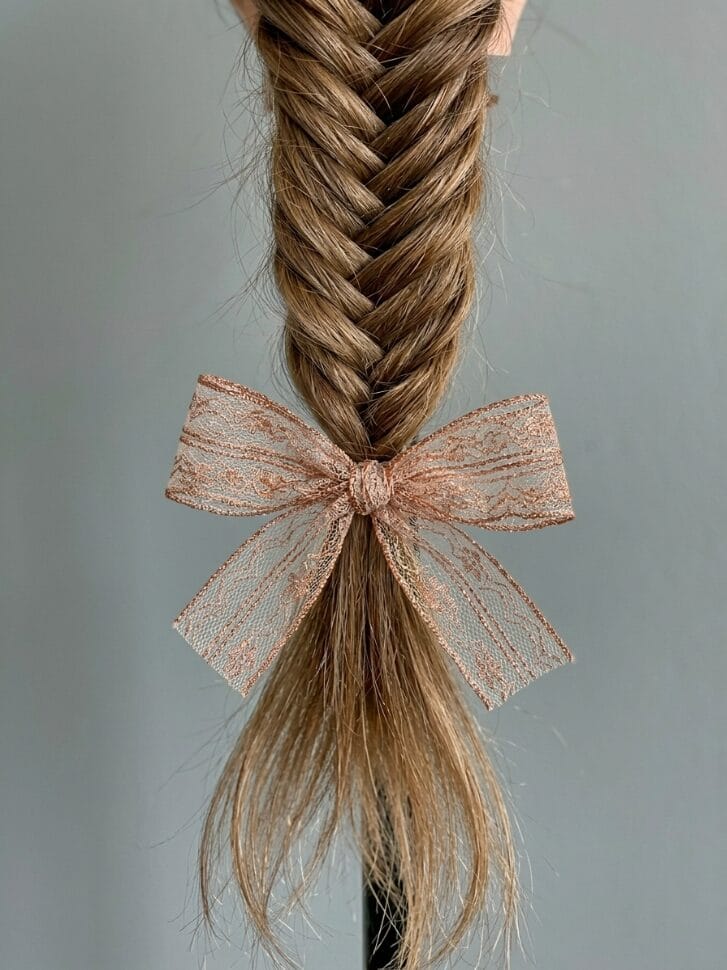
Braid your hair into a long loose fishtail sweeping over one shoulder. Instead of securing the end with a rubber band use a stiff wire edged lace ribbon tied tightly into a sharp bow. Leaving the bottom few inches of hair loose perfectly matches the relaxed energy of the fishtail.
Best for: Long extensions and square face shapes
| Style Details | |
| Face Shape | Square, Oval |
| Hair Texture | Any texture |
| Hair Type | Best for very long hair |
| Difficulty Level | Intermediate |
| Time to Style | Takes 15 minutes |
The Messy Top Knot Bow
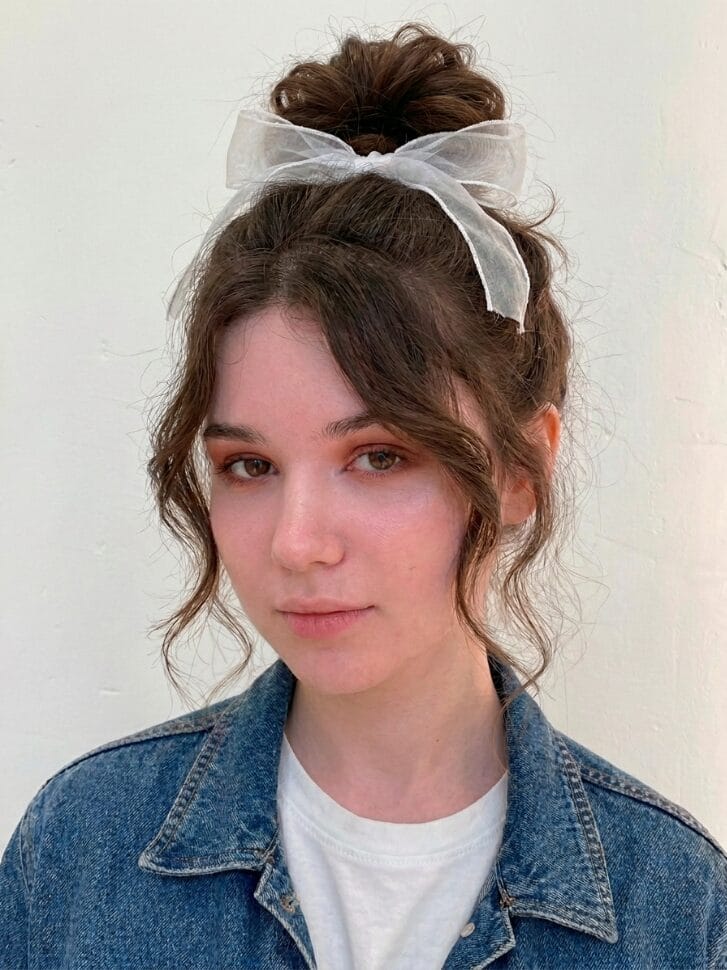
Flip your head forward and gather everything into a highly relaxed top knot. Tie a sheer organza lace piece directly under the bun letting the bow loops sit flush against your head. Pull a few face framing pieces loose around your temples. It takes seconds to do and always looks completely intentional.
Best for: Dense curly hair and oval face shapes
| Style Details | |
| Face Shape | Oval, Heart |
| Hair Texture | Curly |
| Hair Type | Great for thick heavy cuts |
| Difficulty Level | Beginner |
| Time to Style | Takes 5 minutes |
The Hidden Nape Bow
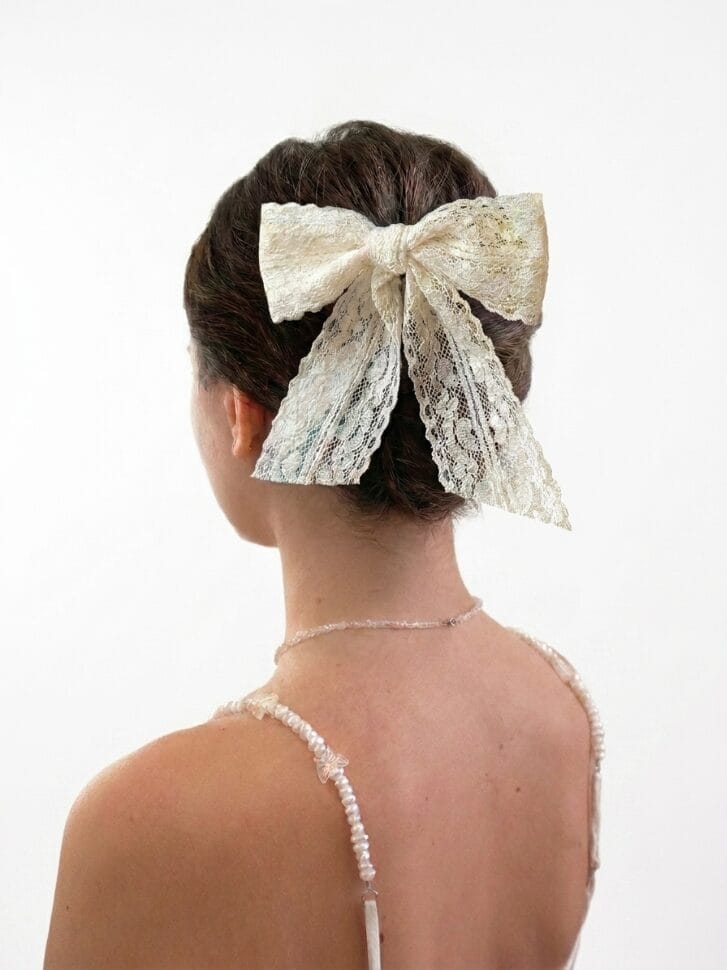
Pull your hair up into a classic French twist and pin it securely. Tie a heavy Guipure lace ribbon into a pristine bow and pin it directly at the bottom base of the twist resting against your neck. This provides a beautiful secret detail for anyone standing directly behind you at a formal event.
Best for: Straight hair and round face shapes
| Style Details | |
| Face Shape | Round, Diamond |
| Hair Texture | Straight |
| Hair Type | Best for blunt medium cuts |
| Difficulty Level | Advanced |
| Time to Style | Takes 15 minutes |
Practical Bow Tying Advice
Working with lace ribbons requires a bit of strategy to keep the bows looking sharp rather than floppy.
Select the Right Lace
Soft silk lace looks beautiful but rarely holds a crisp bow shape. If you want your bow loops to stand up firmly always choose a wire edged lace or a heavily starched cotton lace. The stiff material fights gravity and keeps the style looking fresh for hours.
Secure the Center Knot
A heavy lace bow will eventually slide right off a slick ponytail. After you tie the bow push a single bobby pin directly through the center knot of the fabric and anchor it deeply into the actual hair elastic underneath. This locks the bow completely in place so it cannot shift.
Common Mistakes To Avoid
Using Giant Ribbons on Fine Hair
Tying a massive heavy lace bow onto thin hair completely overwhelms the style and pulls the elastic downward. Always scale the size of the ribbon to match the density of your hair. Fine hair needs delicate thin lace strings while thick hair can support wide structured ribbons.
Ignoring Fabric Fraying
Raw edge ribbons look beautiful but they will unravel onto your clothes. Before you tie your hair up take a tiny drop of clear nail polish and seal the cut ends of your lace. It dries totally invisible and prevents the fabric from shedding threads throughout the day.